Meta Description: This guide covers everything you need to know about Use AnyDesk Sharing Screen from advanced techniques to maximizing your workflow
In this digital world, the world has globalized through remote applications either communication or businesses. In the hectic routine of today’s age, it’s impossible to gather all remote employees on one table. Screen-sharing software has become vital to facilitate remote collaborative teamwork smoothly.
The technological revolution has undoubtedly introduced several remote support tools like AnyDesk Screen Sharing. In this article, we will go through the entire details of this tool. Let’s dive into how to remotely support iPhone, Android, Mac, Windows, iPad, Linux and Ubuntu. We will also recommend another reliable remote support tool featuring exceptional services in real-time screen sharing.
Part 1: What is AnyDesk Screen Sharing?
Use AnyDesk is a screen mirroring software offering worldwide remote access and supports all operating systems. Distant users can monitor their colleagues’ screens through their devices. It enables users to collaborate via audio and video calls and transfer files live.
1. Compatibility for AnyDesk Screen Sharing:
No matter which operating system you are running, you can communicate easily with your co-workers remotely. AnyDesk share screen facility is available for all OS either Android, iPhone, iPad, Mac, Windows, Linux, and Ubuntu. Except for smartphones and computers, it can also be utilized for printers.
2. Scope of AnyDesk Screen Sharing:
Users are keen to know about this question “Can Use AnyDesk Sharing Screen share only one Window instead of the whole screen?
“Use AnyDesk Sharing Screen responds that this function is not available right now. However, we will forward this query to our product manager to work on it”
—From Reddit
Can Use AnyDesk Sharing Screen share the screen with multiple people in a single session? Is also a question of interest of users.
Does AnyDesk share only screen come to users’ mind? The answer is it facilitates multiple participants to share the screen at the same time.
Use AnyDesk Sharing Screen is not suitable for official meetings”
—From Reddit
3. AnyDesk Screen Privacy:
When you turn on theUse AnyDesk Sharing ScreenScreen Privacy” feature, you can disable remote monitors to hide session content from others.
“If you are not technically sharp, outsiders/scammers can attach other processes to your system and can execute things in the background”
—From Reddit
Use AnyDesk Sharing Screen Privacy Mode” connects you remotely via unattended access and your remote device’s screen turns black and the keyboard gets locked”
—From Quora
The users are doubtful about the privacy concerns of the software because of the scammers’ easy approach in some cases. So, caution is required when using AnyDesk.
Part 2: How to Screen Share with AnyDesk?
Mobile Device:
How to Share Android Screens with AnyDesk:
Here is a step-by-step guide to elaborate on how you can share your Android screen with Use AnyDesk Sharing Screen
Step 1: Download AnyDesk:
Visit the Google Play Store and search Use AnyDesk Sharing Screen Android App. For the sharing screen, you need to download AnyDesk. You may go for the free version but downloading licenses is required for the advanced features.
Step 2: Disable Permissions:
For your safety, it’s better to disable all permissions when you allow someone to monitor your screen. It restricts the other person to control your Android smartphone. For this purpose, go to the security settings.

Step 3: Start Screen Sharing through Android:
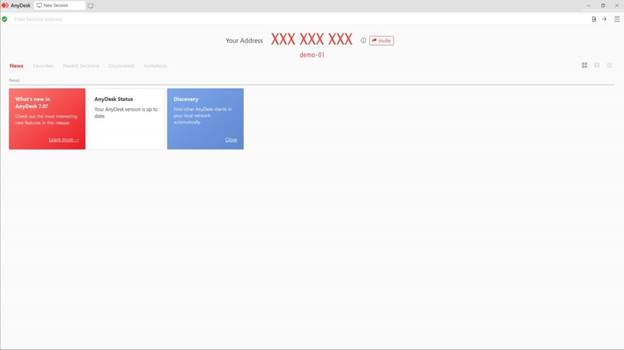
When you open the Use AnyDesk Sharing Screen Android App, a number will be visible to you under “Your Address” on the home page. send this number to the person with whom you want to share the Android screen. Inform the other person to enter that number into Use AnyDesk
Important to Know: On your first session request, you will get a security notification to warn you not to allow anyone you don’t know. Keep in mind everything on your phone will be visible in front of the next person.

Quit the Session: Ending the session should never be forgotten. To do this, press the little X next to your coworker’s name on the AnyDesk home screen.
1. How to Share iPhone and iPad Screens with AnyDesk:
To continue this procedure, you must download and install the Use AnyDesk Sharing Screenapp from the Apple App Store. After installation, follow the steps given below:
Step 1: Go to AnyDesk app and open it on your iPhone and iPad.

Step 2: Your device shows the AnyDesk address. This address is given to other users with whom you want to share your iOS device’s screen.
Step 3: Proceed to Anydesk.com/download on your computer via web browser and install the app on your computer. Then, open it and enter your iPhone/iPad’s AnyDesk address. Click on the “Connect” option as displayed below.

Step 4: A prompt is shown on your device. Press the “Recording” icon here.

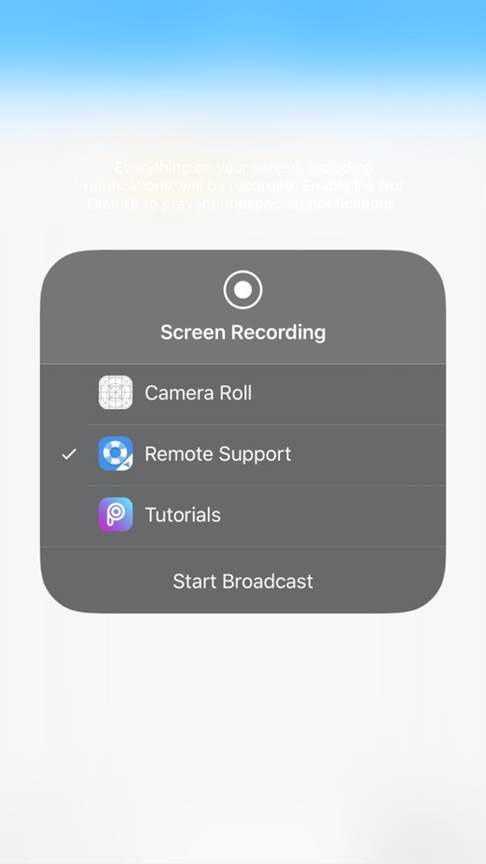
Step 5: To start the screen-sharing session, press the “Start Broadcast” option.

Step 6: Now, you can monitor your device’s screen on a PC using AnyDesk.

PC:
1. How to Screen Share with AnyDesk on Windows:
Users are always concerned about AnyDesk how to share screens. Follow the steps given to screen share with AnyDesk on Windows:
Step 1: Download AnyDesk:
Download Use AnyDeskfirst and open it. On the home screen, Use AnyDesk Sharing Screen ID and Alias will be visible which can be used to connect to your device. In addition, the “Invite Button” will be in front of you next to your ID.
Step 2: Share AnyDesk ID:
Share yourUse AnyDesk Sharing ScreenID directly with a trustworthy person to connect with your device. When you right-click on your ID and choose Invite via Email including your ID or Alias. Share this email with the person you are going to share your screen.
Step 3: Send a Session Request:
When you send a session invitation, the other person is obliged to accept it within 2 minutes. The security concerns made it expire after 2 minutes. Once the session starts, you can view the history of your sent and received session invitations in the section invitations. You can also quit the session anytime you want.

2. How to Screen Share with AnyDesk on Mac:
Use AnyDesk Sharing Screen allows you to conduct sessions with others when the MacOS system gives Accessibility and Screen Recording permission. To continue it, follow the given steps below:
Step 1: On your Mac device, addUse AnyDesk Sharing Screento trusted apps to enable remote access.
Step 2: Head over to the “System Preferences” option and then choose the “Privacy and Security” option.

Step 3: To enable AnyDesk on Mac, go to Privacy>Lock icon.

Step 4: AllowUse AnyDesk Sharing Screen to work on the Mac and another person to view your screen. You have successfully enabled AnyDesk on Mac.
3. How to Screen Share with AnyDesk on Linux and Ubuntu:
For sharing screens on Linux and Ubuntu, first install it on your device. Once you have done so, follow the given prompts.
Step 1: Please make sure the other persons are trustworthy. Then, share with them the number under “The Desk” to connect with your device.
Step 2: A confirmation message is sent to you when you allow the other person to view your screen.
Step 3: To view other persons’ screens, get their code and paste it into the “Remote Desk”. Then, click on the little yellow symbol to continue monitoring their screen. But you can have access to their devices if they allow it.

Tip: How to Solve AnyDesk Screen Share Not Working in Ubuntu:
Use AnyDeskScreen Sharing Not Working issue is that it employs a default display feature in Ubuntu 22.04, known as Wayland. And Wayland does not work for screen sharing by default. To know which display system your Ubuntu is employing, type the command below:
echo $XDG_SESSION_TYPE
If the above-mentioned command yields Wayland means your system is using Wayland. To use the screen-sharing feature, disable Wayland and turn on xorg(x11). To continue it, proceed to the given file:
sudo nano /etc/gdm3/custom.conf
Then, uncomment the given line:
WaylandEnable=false
Restart your system now.
Re-enter this command to confirm sharing your screen:
echo $XDG_SESSION_TYPE
Your screen will display x11. If not visible, use the given command:
sudo systemctl restart gdm
Part 3: How AnyDesk Screen Sharing Helps You with Remote Support:
There are several ways by which AnyDesk Screen Sharing assists with remote support including:
1. Efficient Services:
When sharing screens with other participants, AnyDesk bestows high frame rates, better bandwidth use, and low latency, even at a poor internet connection.
2. Easy to Use:
You are not required a complicated procedure to start with AnyDesk. Simply, you have to provide AnyDesk ID/Alias to the other person who has to enter it in the Remote Desk field.
3. Quick File Transfer:
There is no restriction to send the files within limits. You can share the unlimited files with the next partner that you need. The option of file transfer is valid for all devices and runs quickly.
4. Collaboration:
You are allowed to share your screen with multiple people at the same time. Teamwork improves in this way resulting a great collaborative efforts to build up a business. All the participants can discuss the progress report of the work and give their feedback too. The ideas can be exchanged via the Chat and Whiteboard feature.
Part 4: Remote Support for Business and Individuals with Real-time Screen Sharing
What’s better than software supporting all operating systems and exhibiting unique features like live chat, and file transfer with complete safety? AirDroid is a one-stop remote support software exhibiting real-time screen sharing with end-to-end encryption. It assists with texting and voice messages to help solve problems. This powerful tool also manages unattended devices. Additionally, AirDroid Remote Support is not only available in the enterprise version but also in the personal version.
Features of AirDroid Remote Support:
1. 100% Secure:
AirDroid employs End-to-End encryption to share all your data between devices. The presence of E2EE restricts third parties from intruding on your data when transferring. There is no malware or privacy hazard ever seen with the software.
2. Convenient to Connect:
Connecting the devices does not require any effort or IT skills. If you are a novice, a simple procedure makes it easier for you to use it. Simply, you are required a unique 9-digit code to make a connection.
3. Special Features:
If you use Android, you can use the “Tutorial Gesture” feature. When you touch the shared screen, the gestures show on the remote device. To boost efficiency, you can turn on the “Remote Control” feature to monitor remote devices.
4. Diversity:
You can utilize several features like plain texting, voice messages, or voice calls to discuss the issues. It eliminates the need to utilize other communication apps. Plus, it resolves TV settings or fixes home appliance issues besides phone issues.
How to Use AirDroid Remote Support for Screen Sharing:
AirDroid is compatible with all operating systems and works efficiently for all OS. To know how to use AirDroid Remote Support for screen sharing, follow this step-wise guide below:
For Android Device:
Simply you have to tap the “Start” button in the chat area and your screen will be shared.
For iOS Device:
Step 1: Swipe up from the home screen button. It will open the “Control Center”.
Step 2: Continue with a long press on the “Screen Recording” option.

If you don’t find this option, proceed following the below method:
- Return to the Home Web Page and Open Settings. Then move towards the “Find Control Center” and select the “Customize Control” option.
- After that, find the “Screen Recording” option and press it.
- Choose the “Remote Support” and continue with a click on the “Start” option.
Conclusion:
In this digital age, remote support software plays a crucial role for online businesses and personal uses. People consider grabbing the software’s screen-sharing feature to facilitate online meetups. With the advent of advanced technology, several screen-sharing tools have emerged nowadays like AnyDesk and AirDroid. Besides efficiency and compatibility with all OS, security is mainly considered when choosing remote support software. I hope this article will help you select the best and most secure screen-sharing software for individual and commercial use.
But what’s better than software supporting all operating systems and exhibiting unique features like live chat, and file transfer?